Tag Archives: Appetizer

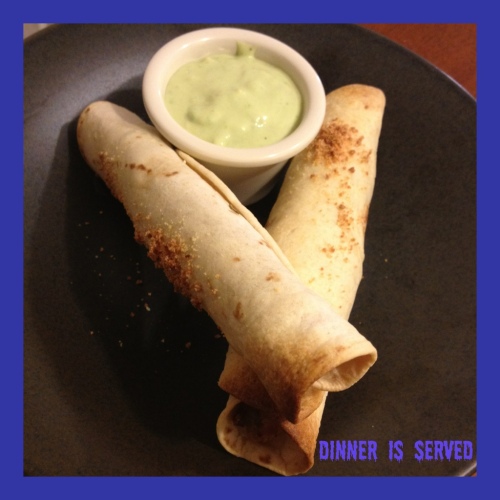
Baked Taquitos With Avocado Sauce

20120702-085854.jpg

We are all about finger food around here and if any sort of dip is included, it’s a double whammy. This recipe fit that bill, 100%.

These particular taquitos I made using some leftover grilled pork that I had chopped up. I’m sure beef or chicken would work great in these as well if you are not a fan of the pig (gasp!) I baked these in flour tortillas to keep it a little healthier (rather than frying the corn tortillas in oil.)

We really enjoyed this avocado dipping sauce, it was creamy deliciousness. We have had variations of this at restaurants all over and always enjoyed it so I thought it would be a great dip to go with the taquitos. It’s not the sort of dip that can sit around so I would make it when you want to eat it. If you are so inclined, a nice salsa would also make a great dip for these taquitos.

This was very kid-friendly as well. Both my boys ate the taquitos. Foodie Jr. opted to dip his in ranch dressing as he does most other finger foods. Baby Foodie is not much of a dipper so he just ate the taquitos. And, as suspected, the biggest kid of them all, Mr. Foodie had no complaints.

INGREDIENTS

Taquitos:
1 package fajita sized flour tortillas (16)
2 Cups leftover meat (pork, chicken or beef)
~1/4 Cup Mexican Crema
~1/3 Cup Finely grated Cojita Cheese
Olive oil

Dipping Sauce:
1 avocado, pitted and mashed
1/4 Cup Mexican Crema
1/4 Mayonaise (I prefer the one with olive oil)
Splash of milk
2 Tsp white wine vinegar
1/4 Tsp Salt
1/4 Tsp Onion powder
1/4 Tsp Garlic powder
To taste: black pepper and chopped cilantro

DIRECTIONS

For Taquitos:

Pre-heat oven to 400 degrees and spray cookie sheet with cooking spray.

1. I a mixing bowl, add chopped meat, Crema and Cojita cheese and mix well. Add more Crema and cheese if necessary – meat mixture should come together and be sort of ‘sticky’.

2. Place a heaping tablespoon or two on each tortilla and spread into a line for rolling.

3. Roll up each tortilla and place seam
side down on cookie sheet.

4. Brush each taquito with olive oil and bake for 15-20 minutes. Ovens will vary so check and take out when tortillas are browned and crispy.

For Dipping Sauce:

1. Put all ingredients in bowl and mix until they all come together smoothly. There will be a light green tint to the sauce. Play with the spices to suit your family’s taste.

Black Truffle Oven Crisp Fries

I’m baaaaaack!  I took a little hiatus from blogging (but not from cooking) as this new year has started off as quite a doozy!  I’m hoping that the Foodie Family has a nice, peaceful remainder of 2012 – and hope I didn’t just jinx us by putting that in print!

Now, onto the matter at hand…  I made this recipe on Baby Foodie’s first birthday as he is a BIG FAN of the French Fry.  I stumbled upon a spice store on one of our little adventures and among the wonderful booty I came away with was Black Truffle Salt.  Oh.  Em.  Gee.  (Can I actually write that on a food blog?)  Anyway, I just love this stuff.  The Salt.  The Truffle.  The Togetherness.  It was love at first taste (sniff, really.)  Perfecting a crunchy oven-baked french fry has been on my to do list for a while.  I’ve played with this a lot in the past and have come up just sort of shrugging my shoulders – just okay.  Crispy, but not crispy enough.  I knew I had to get it right to use some of my truffle salt goodness on them.  And, I finally did!

Mr. Foodie really liked these and requested them again.  And again.  Foodie, Jr. was not interested in them as they did not come in a little red paper container with golden arches on them.  Baby Foodie was all over them and was a very happy ONE YEAR OLD!

BLACK TRUFFLE OVEN CRISP FRIES

Ingredients:

1 Ib. Russet Potatoes, peeled

1-2 TBS Vegetable Oil

Cooking Spray, such as Pam

Black Truffle Infused Salt, to taste

Directions:

1.  Preheat oven to 400 degrees (ovens may vary, so you may want to play with the temp.)

2.  Slice potatoes lengthwise, making thin strips.

3.  In a bowl, toss the potatoes with the oil, be sure to coat well

4.  Spray a cookie sheet with cooking spray and spread potatoes out in a single layer.

5. Bake the fries for 15 minutes, then toss.

6.  Bake for about 10 minutes more, until you reach your desired crispness.

7.  Remove fries from oven and immediately sprinkle with Black Truffle Salt to taste.

Baked Kale Chips with FAGE Garlic Basil Dip

As part of the Foodbuzz Tastemaker’s Program, I have agreed to participate in the FAGE Total program and blog about good living in exchange for being entered to win an extraordinary eight day trip to Greece.

I have been using the FAGE products for quite a while and love them.  I’ve been on a quest lately to make some changes to our family diet.  One of Mr. Foodie’s biggest downfalls is potato chips.  It amazes me how many chips he can down in a sitting!  So, in an effort to make a change, I thought I would try some kale chips.  I am a big fan of kale generally, but I wasn’t sure exactly how Mr. Foodie would feel about them.  To my surprise, he really liked them and munched on them through the evening.  While the chips are a great snack on their own, I thought I’d try to create a little dip for them using some FAGE yogurt I had on hand in the event I ever wanted to use these ‘chips’ at a gathering.  It was a simple dip and I thought it complemented the chips very nicely.  If you haven’t tried these very popular morsels yet and are trying to work on a healthier lifestyle for yourself and family, I really recommend giving them a try.  They might not taste just like the junk food chips you are used to but they are definitely a tasty snack!

BAKED KALE CHIPS WITH FAGE GARLIC BASIL DIP

Ingredients:

1 Bunch of Kale, washed and dried (any variety is okay)

1 TBS Olive Oil (you can add more to your taste)

Sea Salt, to taste

Fresh Cracked Black Pepper, to taste

3 TBS Fage Total 0% Greek Yogurt

Fresh Garlic Paste, to taste

Fresh Basil Paste, to taste

Water

Directions:

1.  Preheat oven to 300 degrees and line cookie sheet with parchment paper or foil sprayed lightly with cooking spray.

2.  Remove all stems/ribs from kale then toss in olive oil.

3.  Place kale on cookies sheet in a single layer.  You want to minimize the overlap as to reach maximum crispness.  Season with salt and pepper as desired.

4.  Bake kale for 20-30 minutes.  Ovens will vary so continue to check until they reach your desired crispiness, be careful not to let them burn.

5.  While the chips are baking, combine yogurt, basil and garlic in a small dipping dish.  Mix together well, adding tiny amounts of water to thin the sauce out a bit.  The yogurt tends to be thick and sometimes the kale chips will break off into it.  Thinning it out makes dipping easier – it does not take much water to do this, maybe a few drops.

7.  When chips are done, remove from oven and sprinkle with additional salt and/or pepper if desired.  Let cool and serve immediately.

“As part of the Foodbuzz Featured Publisher program, I have been entered for the chance to win a trip to Greece courtesy of FAGE. You too can enter to win one of three trips to Greece by entering the FAGE Plain Extraordinary Greek Getaway here: http://www.fageusa.com/community/fage-greek-getaway

Cali Roll Salad To Go

Foodie Jr. LOVES California Rolls.  He would eat them all day, every day, if I let him.  He isn’t too fond of salad though.  This was my attempt to compromise with him on a very busy night that had us on the go.  We keep a pretty busy schedule around here and being able to whip these up while he was at school for quick assembly  at dinner time was a big help.  I normally would make these with real crab but I had the surimi on hand the day I made these and no time to get to the store to buy lump crab meat.  (Shrimp would be just fine to use as well.)   Foodie Jr. will eat them either way, so I luck out there.  I do not think this is an earth shattering recipe or anything, but it might be a helpful idea to some, especially busy families.  You could easily replace the crab with tofu or simply load it with more avocado if you do not like seafood.  Mr. Foodie and I enjoy these as well and they make for a great, light meal or a quick appetizer for a gathering.  I generally make a platter of them at a time but it is fun to let your guests make their own as well.

CALIFORNIA ROLL SALAD TO GO

Ingredients:

-Lump Crab Meat (flaked) or Surimi (chopped), lightly tossed with Japanese or regular mayonaise.

-English Cucumbers, peeled, sliced thin and marinated in Mirin (or rice wine vinegar)  and black pepper for a few hours

-Avocado, chopped or slice per your preference

-Nori Komi Furikake (Japanese Rice Seasoning)

-Hearts of Romaine, broken in half to form a sort of lettuce cup to hold salad

Directions:

1. Layer ingredients onto romaine lettuce cup, I usually go crab, avocado, cucumber and top with furikake.

Cajun Spiced Pumpkin Seeds

Happy Halloween!  We did our pumpkin carving last night (kudos to Mr. Foodie for his Ninjago pumpkin) and like everyone should, we roasted the seeds.  Foodie Jr. isn’t a big fan of the pumpkin seeds, so Mr. Foodie and I agreed that it would be a yummy twist to do Cajun spiced seeds for us, since we like a little heat.  I didn’t so much use a recipe for this, as much as I eyeballed it, but I did put in some basic amounts.  I suggest you just play with yours –  to your liking.  Wishing all of you a happy and safe Halloween night – lots of treats and not so many tricks!

CAJUN SPICED PUMPKIN SEEDS

Ingredients:

-Seeds from one pumpkin, cleaned and dried (They say a regular sized pumpkin will yield about a cup to a cup and half of seeds, we got about a cup out of ours.)

~ 1-2 Tsp of your favorite Cajun Seasoning Blend

~ 1-2 Tsp Paprika (per your taste, mostly for color)

~1 Tsp Worcestershire Sauce

~1 -2 TBS Olive Oil

Directions:

1.  Preheat oven to 300 degrees.

2.  In a small bowl, combine all your ingredients and toss well, making sure the seeds are evenly coated with olive oil and seasonings.

3.  On a foil lined cookie sheet (you can also spray with cooking spray, but not needed) spread seeds in an even, single layer.

4.  Bake for about 45-55 minutes, turning seeds once about half way through cooking time.

Grilled Grilled Cheese

Fall is here and grilling season is coming to an end.  So, I thought I’d squeeze in just one more grill recipe before we head toward all things pumpkin and soup!  A friend hit the tomato jackpot in her garden and I got to inherit a whole lotta tomatoes!  We were grilling so I decided to do a little open face grilled cheese appetizer for us to chomp on while the meat cooked.  They are kind of funny looking but, they were tasty!

GRILLED GRILLED CHEESE

Ingredients:

16 Cherry Tomatoes, halved

4 Ciabatta Rolls, halved

8 Slices Havarti Cheese

1-2 Fresh Garlic Cloves

Olive Oil

Salt & Pepper

Directions:

1.  Fire up the grill and get those coals ready to cook!

2.  Scrape each piece of bread with the garlic clove and sprinkle with salt and pepper for flavoring.

3.  Brush top side of bread with olive oil and place top side down on the grill for a few minutes to brown and get some nice grill marks going.

4.  Flip bread pieces over and top with tomato halves (about 4 on each piece depending on the size of your tomatoes.)

5.  Top tomatoes with a slice of cheese.

6.  Heat until cheese is melted to your liking.

Elote

Elote is a Mexican street food – basically corn on the cob.  You may see it frequently being sold in some neighborhoods by people pushing little metal carts.  I really liked having my grilled corn like this, it gave it a nice creamy flavor with a little punch.  (Mr. Foodie said it was a little too creamy for his taste.)    It would be a little bit rich to have your corn this way all the time, but it was a nice addition to our little weekend BBQ feast.

ELOTE

Ingredients:

4 Ears of corn, still in husks but silk removed

1/4 Cup Melted Butter

1/4 Cup Mayonaise

Juice of 1/2 Lime

Crumbled Cotija Cheese

Hot Mexican Chile Powder

Lime Wedges

Directions:

1.  Grill corn in husks about 15-20 minutes, turning at least once during cooking time.

2.  While corn is grilling, mix melted butter, mayonaise and lime juice until well blended.

3.  Remove corn from grill, remove or pull back husks and spread butter mixture onto corn.

4.  Sprinkle with desired amount of chile powder and cotija cheese before serving with lime wedges.

KC Masterpiece Buffalo Chicken Lumpia

I recently received a bottle of the new K.C. Masterpiece Buffalo Marinade through the Foodbuzz Tastemaker  Program.  Mr. Foodie and I both love buffalo sauce so I was excited to make something with this new marinade.  One of my favorite things to do in the kitchen is to come up with fusion recipes, I love taking the unexpected and putting them together.  I decided to make some buffalo chicken lumpia, a Filipino version of the spring roll.  We generally abide by the ‘anything fried is good’ rule around here and this was no exception.  The crispiness of the lumpia wrapper collided with the creaminess of the filling and it worked.  We enjoyed it.  We used three different dipping sauces – ranch dressing, the K.C. Masterpiece Buffalo Marinade, and a combination of the two.  Mr. Foodie loved dipping them in more of the marinade and I really liked the marinade/rancho combo.  Thank you to Foodbuzz and KC Masterpiece for the opportunity!

KC MASTERPIECE BUFFALO CHICKEN LUMPIA

Ingredients:

4 Boneless, Skinless Chicken Breasts

1 Bottle of KC Masterpiece Buffalo Marinade

1 Packet of Ranch Dressing Seasonings

1 8 oz. Tub of Cream Cheese

50 Lumpia Wrappers

Water, for sealing lumpia

Vegetable oil for frying

Directions:

1.  Mix about 2/3 of the marinade with one packet of ranch dressing seasoning, set aside.

2.  Place chicken breasts in crockpot, cover with marinade/dressing mixture and heat on high for 5-6 hours.

3.  Once chicken is done, shred finely with forks and let cool completely.

4.  Let frozen lumpia wrappers thaw for about an hour (or per package directions, which may vary from brand to brand.)

5.  Once chicken is completely cooled, mix in cream chese.  (I did this by hand to get it mixed in really well.)

6.  Place about a tablespoon of chicken mixture on one end of the lumpia wrapper, rolling and folding in sides until formed.  Seal with water.

7.  Heat vegetable oil in skillet over medium heat.

8.  Fry lumpia in oil until golden brown, let cool slightly before serving with desired dipping sauce.

Caramelized Onion Bruschetta

I was going to make a traditional bruschetta as an appetizer for a recent baby shower and then remembered this caramelized onion (not recognizable as onions, more of a paste,) tomato and feta focaccia dish that Mr. Foodie and I used to order at Fuzio.  I had originally planned to try to re-create that dish but then came across an old Betty Crocker recipe for these.  I adapted the recipe a bit for my needs and what I found in the grocery store and the results were GREAT.  I really enjoyed this appetizer and Mr. Foodie, who hates onions, even liked them.  If you are ever in a pinch and need to bring an appetizer to a party, this is a really easy one that is also delicious.
CARAMELIZED ONION BRUSCHETTA
Ingredients:

1/2 Cup Butter

2 Large Sweet Onions, peeled and diced small

1/4 Cup Sugar

3 TBS Balsamic Vinegar

1 Package Garlic and Herb Crostini

1 8 oz. Tub Onion and Chive Cream Cheese

Directions:

1.  Melt butter in large skillet over medium-high heat.

2.  Add onions to skillet and cook about 5 minutes, until softened.  Stir frequently.

3.  Stir in sugar and balsamic vinegar and continue to cook until the onions are very soft and browned, 10-15 minutes.

4.  Allow onion mixture to cool about ten minutes.

5.  Spread cream cheese on crostini and top with a bit of the caramelized onion mixture.

The 1950’s Revisited – Porcupine Balls

At a recent church group meeting, the conversation turned to these little morsels:  porcupine balls.  I had never heard of them or eaten them prior to our meeting – that I recalled anyway.  I am generally a fan of the meatball and love to try anything once.  I did a little research on this meal and found out that it was a staple for many in the 1950’s.  When I mentioned them to my mother, she even replied, “Wow, I haven’t heard about those in ages.”

I knew they would go over well with the male Foodies in our household, especially served with mac-n-cheese – might as well go totally 1950’s, right?  Surprisingly, these were yummy and went very well texture-wise with the mac-n-cheese.  The ‘porcupine’ part comes from the fact that there are rice in these meatballs and I wasn’t sure what to serve them with, turns out mac-n-cheese was a good combo!  I made some changes to the original recipe that was given to me, they are noted.

PORCUPINE BALLS

Ingredients:

1 lb. Ground turkey (original recipe called for ground beef)

½ lb. Pork sausage (original recipe called for 1 lb.)

3 TBS Dried, minced Onion (Original recipe called for 1 small onion, minced)

Salt and pepper to taste

½ c. Uncooked rice

½ c. Ritz cracker crumbs

1 Egg

1 Can of tomato soup

Directions:

1.  Pre-heat oven to 375 degrees.

2.  In a large mixing bowl, combine all ingredients but tomato soup.

3.  Shape meat mixture into balls and place in a well greased 9×13 baking dish.

4.  Mix can of tomato soup with 1/2 can of water and then pour over meatball mixture.

5.  Bake for about an hour, turning at least once.