Tag Archives: Vegetarian

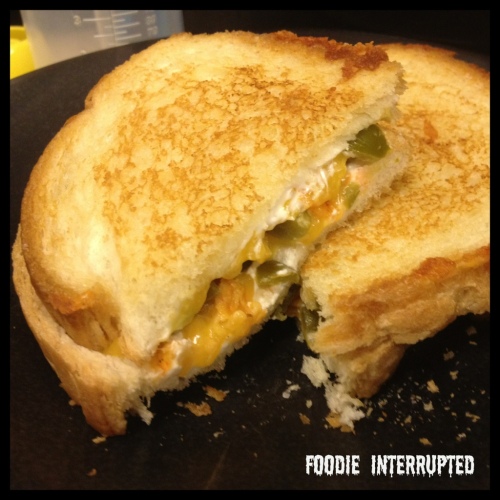
Jalapeño Popper Grilled Cheese Sandwich

20120917-112147.jpg

It’s been quite the whirlwind around here at Foodie Central! School, sports, Scouts and pure craziness hasn’t left a lot of time for cooking, much less blogging!

This sandwich is for Mr. Foodie. He’s a jalapeño popper junkie and I thought this would be right up his alley. This was a yummy sandwich and we both enjoyed it. I made this both with fresh diced jalapeños and with the canned roasted diced jalapeños. Our personal take was that the canned was much better and gave a more authentic popper taste. The fresh diced did not work well for us. I do believe if you took the time to roast your own fresh ones, that would be the best bet though, so if you have the time, definitely go that route!

The ingredient list is general, do as you see fit for with the amounts per your personal taste!

JALAPEÑO POPPER GRILLED CHEESE SANDWICH

Ingredients:

-Sliced French Bread
-Butter
-Cream Cheese
-Shredded Sharp Cheddar Cheese
-Canned Roasted Dice Jalapeños

Directions:

1. Butter one side of each slice of bread, and spread cream cheese on the other side.

2. Place butter side down on a non-stick pan over medium heat.

3. Spread a bit of the jalapeños on one slice of bread and top with shredded cheddar cheese.

4. Continue to cook until cheddar cheese melts and then top it with the other slice, cream cheese side down.

5. Once the outside of the bread is crisp and browned to your liking, you are ready to eat!

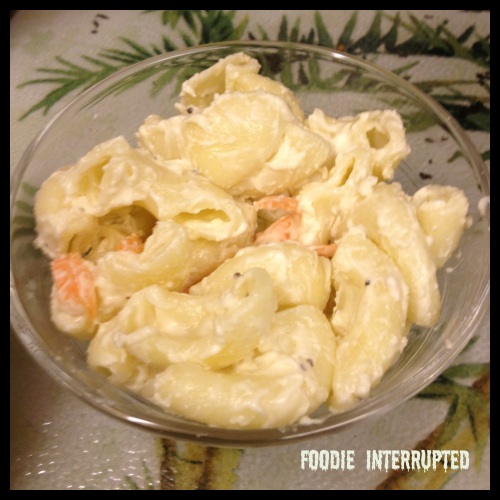
Hawaiian Style Macaroni Salad

If you’ve ever been to Hawaii (or a Hawaiian BBQ restaurant on the Mainland) you know that virtually everything is served with a side, or scoop of ‘mac salad’.  The Hawaiian plate lunch consists of the main entree, generally two scoops of rice and macaroni salad.  It might seem like a strange combo to some, but it’s just the way it is.  Everyone has their version of this picnic food and the folks in Hawaii are no different.  This might seem too soft (overcooked) and too mayonaisy (made that word up) to some but that is generally how it is served.  I have to say that I like macaroni salad in most forms, but Hawaiian style is my favorite.  This recipe was adapted to one I found a while back from Cook’s Country Magazine.  While writing this post, I am also imagining myself eating it in Hawaii so it is a little mental getaway for me!  Be warned this recipe makes a lot (serves 8-10) so it’s good for a potluck.  Didn’t want you to have it coming out of your ears!

HAWAIIAN STYLE MACARONI SALAD

Ingredients:

-2 Cups Whole Milk

-2 Cups Mayonaise

-1 TBS Brown Sugar

-1/2 Tsp  Plus 1 TBS Salt

-2 Tsp Black Pepper

-1 Lb. Large Elbow Macaroni

-1/4 Cup Cider Vinegar*

-1/3 Cup Shredded Carrot

*Original recipe called for 1/2 Cup Cider Vinegar but I feel that is too much.  Some don’t add it at all, so it is really up to you and your personal taste.

Directions:

1.  Make a dressing by whisking together, in a small bowl: 1 1/2 Cup Milk, 1 Cup Mayonaise, Brown Sugar, Salt and Pepper.

2.  Boil Macaroni, adding 1 TBS Salt to the water, and cook for 15 minutes.  The pasta will be very soft, this is okay.  Drain it and return to the pot.

3.  Add vinegar to the Macaroni and toss – let cool for about 10 minutes.

4.  Stir in prepared dressing and cool completely.

5.  Add the Carrot, remaining Milk and Mayonaise to the cooled Macaroni and mix well.  Season with Salt and Pepper to taste.

6.  Refrigerate for at least one hour before serving, can be chilled up to two days.

Black Truffle Oven Crisp Fries

I’m baaaaaack!  I took a little hiatus from blogging (but not from cooking) as this new year has started off as quite a doozy!  I’m hoping that the Foodie Family has a nice, peaceful remainder of 2012 – and hope I didn’t just jinx us by putting that in print!

Now, onto the matter at hand…  I made this recipe on Baby Foodie’s first birthday as he is a BIG FAN of the French Fry.  I stumbled upon a spice store on one of our little adventures and among the wonderful booty I came away with was Black Truffle Salt.  Oh.  Em.  Gee.  (Can I actually write that on a food blog?)  Anyway, I just love this stuff.  The Salt.  The Truffle.  The Togetherness.  It was love at first taste (sniff, really.)  Perfecting a crunchy oven-baked french fry has been on my to do list for a while.  I’ve played with this a lot in the past and have come up just sort of shrugging my shoulders – just okay.  Crispy, but not crispy enough.  I knew I had to get it right to use some of my truffle salt goodness on them.  And, I finally did!

Mr. Foodie really liked these and requested them again.  And again.  Foodie, Jr. was not interested in them as they did not come in a little red paper container with golden arches on them.  Baby Foodie was all over them and was a very happy ONE YEAR OLD!

BLACK TRUFFLE OVEN CRISP FRIES

Ingredients:

1 Ib. Russet Potatoes, peeled

1-2 TBS Vegetable Oil

Cooking Spray, such as Pam

Black Truffle Infused Salt, to taste

Directions:

1.  Preheat oven to 400 degrees (ovens may vary, so you may want to play with the temp.)

2.  Slice potatoes lengthwise, making thin strips.

3.  In a bowl, toss the potatoes with the oil, be sure to coat well

4.  Spray a cookie sheet with cooking spray and spread potatoes out in a single layer.

5. Bake the fries for 15 minutes, then toss.

6.  Bake for about 10 minutes more, until you reach your desired crispness.

7.  Remove fries from oven and immediately sprinkle with Black Truffle Salt to taste.

Lemon Oatmeal Cookies – The Great Food Blogger Cookie Swap!

A little bit about ‘The Swap”…

I was hanging out on Twitter late one night when I happened upon Love and Olive Oil and The Little Kitchen‘s tweets about their Great Food Blogger Cookie Swap.  I was in luck as it wasn’t too late to sign up, which I immediately did.  I used to attend a local mother’s group cookie swap every year and it was a lot of fun.  I am no longer a member of that club and while I still participate in smaller swaps, I wanted to do a bigger one.  At the time I had signed up, they had about 550 bloggers from around the world signed up to swap cookies.  I thought that was pretty darn cool and it was fun being a part of it.  I got to exchange 3 dozen of my cookies with 3 other bloggers, blogs I had never read before!  They estimate that over 22.000 cookies were swapped across this big ole world!  That’s a lot of cookies and I’m happy I got to be a part of it!  If you missed it this year and would like information on how to participate in the next one, sign up here.

A little bit about the cookies I received…

1.  Sisters’ Snacktime ( AJ & Jas Hwang) provided me with my first cookies.  They sent me two kinds (!) –  Peach and Crisp Salted Oatmeal with White/Dark Chocolate.

2.  I got my second set of cookies from Lana Watkins at Bibberche.  They were called Roses and were Serbian recipe from her Grandmother.

3.  My final set of cookies arrived from Chrissy and Dana Marie DeCapite at Sorelle e Cibo.  They were a really yummy white chocolate macadamia and cranberry cookie.  (Mr. Foodie ate them all.)

Thank you to all of my Cookie Swappers!  I enjoyed the different cookies and stories.

A little bit about the cookies I swapped…

I wanted to make a cookie I had never made before and I wanted it to be a little bit different.  Don’t get me wrong, I love your standards like chocolate chip or peanut butter, but I definitely wanted to go in another direction.  When I was pregnant with Foodie Jr., I became part of an internet message board for moms delivering in the same month and year.  I immediately made friends with a gal named Jen and we’ve been friends ever since.  And although we haven’t even met in person, I still consider her one of my best, dearest friends.  One thing we have in common is a love of food.  I sooooooooo trust her taste in food and have not disliked any recipe she has ever passed along.  She gave me this recipe for her favorite cookie a few years back and I’ve never gotten around to trying it.  I have no idea why I waited so long because these are definitely on MY list of favorite cookies now!  This recipe came from her father’s mother and I just love that – recipes that are passed down from one generation to the next.  These cookies are pretty simple to make and generally are things you would normally (well, I would) have on hand.  These cookies can be made chewy or crunchy.  While I think everyone here preferred them on the chewier side (my friend Jen included) the crunchy ones are good too and great for having with coffee or tea.  I adore this recipe and am going to make it several more times this holiday season – my new go-to cookie.  These would be great iced too so I might have to try that!

LEMON OATMEAL COOKIES

Ingredients:

1/2 Cup Shortening

1/2 Cup White Sugar

1/2 Cup Brown Sugar

1 Egg

1 1/2 Tsp Grated Lemon Rind (I used the rind of an entire lemon)

1 1/2 TBS Molasses

1/2 Tsp Vanilla

3/4 Cup plus 2 TBS Flour

1/2 Tsp Baking Soda

1/2 Tsp Salt

1 1/2 Cups Rolled Oats

Directions:

1.  Preheat Oven to 400 Degrees (once dough is done chilling.)

2.  Mix the first seven ingredients (shortening, white sugar, brown sugar, egg, lemon rind, molasses and vanilla) thoroughly.

3.  Sift together the next three ingredients (flour, baking soda, salt) and add to the first mixture.

4.  Stir in rolled oats and mix thoroughly by hand.

5.  Press and mold into a long smooth roll about 2 1/2′ diameter.  Wrap in wax paper and chill until stiff (several hours or overnight.)

6.  With a thin, sharp knife cut into thin slices 1/8′ thick.  Place slices on an ungreased cookies sheet and bake until lightly browned, about 8-10 minutes.

A few notes:  These overcook really quickly so if you prefer them on the chewy side, they won’t look quite ‘done’ when you take them out.  Just let them sit on the sheet for another 5 minutes before moving to a rack to cool.  Also, this recipe doesn’t double well, so make each batch individually.

Baked Kale Chips with FAGE Garlic Basil Dip

As part of the Foodbuzz Tastemaker’s Program, I have agreed to participate in the FAGE Total program and blog about good living in exchange for being entered to win an extraordinary eight day trip to Greece.

I have been using the FAGE products for quite a while and love them.  I’ve been on a quest lately to make some changes to our family diet.  One of Mr. Foodie’s biggest downfalls is potato chips.  It amazes me how many chips he can down in a sitting!  So, in an effort to make a change, I thought I would try some kale chips.  I am a big fan of kale generally, but I wasn’t sure exactly how Mr. Foodie would feel about them.  To my surprise, he really liked them and munched on them through the evening.  While the chips are a great snack on their own, I thought I’d try to create a little dip for them using some FAGE yogurt I had on hand in the event I ever wanted to use these ‘chips’ at a gathering.  It was a simple dip and I thought it complemented the chips very nicely.  If you haven’t tried these very popular morsels yet and are trying to work on a healthier lifestyle for yourself and family, I really recommend giving them a try.  They might not taste just like the junk food chips you are used to but they are definitely a tasty snack!

BAKED KALE CHIPS WITH FAGE GARLIC BASIL DIP

Ingredients:

1 Bunch of Kale, washed and dried (any variety is okay)

1 TBS Olive Oil (you can add more to your taste)

Sea Salt, to taste

Fresh Cracked Black Pepper, to taste

3 TBS Fage Total 0% Greek Yogurt

Fresh Garlic Paste, to taste

Fresh Basil Paste, to taste

Water

Directions:

1.  Preheat oven to 300 degrees and line cookie sheet with parchment paper or foil sprayed lightly with cooking spray.

2.  Remove all stems/ribs from kale then toss in olive oil.

3.  Place kale on cookies sheet in a single layer.  You want to minimize the overlap as to reach maximum crispness.  Season with salt and pepper as desired.

4.  Bake kale for 20-30 minutes.  Ovens will vary so continue to check until they reach your desired crispiness, be careful not to let them burn.

5.  While the chips are baking, combine yogurt, basil and garlic in a small dipping dish.  Mix together well, adding tiny amounts of water to thin the sauce out a bit.  The yogurt tends to be thick and sometimes the kale chips will break off into it.  Thinning it out makes dipping easier – it does not take much water to do this, maybe a few drops.

7.  When chips are done, remove from oven and sprinkle with additional salt and/or pepper if desired.  Let cool and serve immediately.

“As part of the Foodbuzz Featured Publisher program, I have been entered for the chance to win a trip to Greece courtesy of FAGE. You too can enter to win one of three trips to Greece by entering the FAGE Plain Extraordinary Greek Getaway here: http://www.fageusa.com/community/fage-greek-getaway

The Pumpkin Pie Post

Some say it might be obligatory, it being Thanksgiving and all.  Either way, here it comes:  my pumpkin pie post.

Recently, I’ve been pinning the heck out of things on Pinterest.  (I’m on there as Foodie Interrupted – follow me and you will see proof of my obsession.) I kinda feel like I’m a serial re-pinner.  I oogle over peoples boards of food dishes and fun  crafty projects and re-pin away.  I do this, of course, because I will make every single one of those dishes and crafts one day.  I swear.  No, really…  Well, one of the things I pinned recently was a cinnamon roll pie crust.  With this pie heavy holiday upon us, I thought this was a perfect fit, so I went for it.  I also needed something to take to the in-laws and who better to experiment on?  (Besides, I was asked to bring the pumpkin pie.)  My crust didn’t look as pretty as the original one I pinned over at Pinterest, but I was still very happy with it.  Here’s a pic of the cinnamony goodness:

The cinnamon roll crust only goes to the top edge of the pie plate so I decided to get all fancy and make a nice leaf crust around the top.  You don’t have to do this at all but I thought it looked better and there may be some crust lovers in the crowd that this move would please.  Please note that I sort of did the fancy schmancy leaf thing as an afterthought, so when you read my directions for adding it – BE CAREFUL!

I have not actually made pumpkin pie in a few years, somebody else is usually in charge of that!  I generally don’t have a set in stone recipe, either.  I know, who doesn’t have a pumpkin pie recipe, right?  Well, this girl doesn’t.  I contemplated doing something different with the pie filling but since I had already done the cinnamon roll crust, I didn’t want to mess too much with the filling.  Sometimes, less is more.  I was already sweating bullets debating whether or not to add more cinnamon to the filling with the given crust and concerned about serving a ‘cinnamon pie with a hint of pumpkin’ to my in-law family.  Well, what I ended up making worked, it was a good pie.  Foodie Jr. and Baby Foodie woofed this pie down.  Baby Foodie even screamed at his big brother to share more.  Brothers fighting over pie, who woulda thunk it?

This could be one of the worst iphone food pics in the history of the world.

CINNAMON ROLL PUMPKIN PIE

Ingredients:

1 9-inch pie shell, pre-made or homemade is fine

1 TBS Butter, melted

Cinnamon, enough to sprinkle all over single pie crust

15 oz. of Pumpkin (canned or fresh – I used canned Organic)

1 Cup Evaporated Milk

1/2 Cup Whole Milk

2 Eggs

3/4 Cup Dark Brown Sugar

1/4 Tsp Salt

1/2 Tsp (scant) Cinnamon

1/4 Tsp Ground Ginger

1/4 Tsp Ground Nutmeg

1/8 Tsp Ground Clove

Directions:

1.  Preheat Oven to 400 degrees.

2.  Place pie crust on a lightly floured surface and brush with melted butter.  Sprinkle cinnamon all over the entire crust – as if you were making cinnamon rolls.

3.  Tightly roll the pie crust up and cut into 1/2 inch segments.  Line a 9 inch pie plate with the cinnamon rolls by placing them flat side down and pressing them into the dish, all the way to the edge.

4.  For the pie, place all remaining ingredients in a large mixing bowl and blend together very well – I used a hand held egg beater and it worked great.

5.  Pour the pumpkin mixture into your pie shell and bake in the oven for about 40-45  minutes (ovens will vary.)

6.  Remove pie and cool before serving.

NOTE:  If you wish to make the additional leaf crust: Use any extra pie crust you have and cut leaves out (I used the Wilton cut-outs.)  Keep them refrigerated and then dip them in an egg wash and add to the edge of your pie, the last 10-15 minutes of cooking.

Cranberry Jalapeno Sauce

Or ‘cranapeno’ sauce?  Whether you go with the long drawn out name in the title or the cutesy nickname I gave it, it tastes the same – good.  I’ve known a lot of people over the years who make a version of this and I generally put my feet up and let someone else make the cranberry sauce for Thanksgiving but this year, I thought I’d give it a try.  (Frankly, I did not even start eating any kind of cranberry sauce until maybe five years ago, it never did anything for me.)  And though I now love my beloved can-shaped, congealed, whatever that is that graces family tables every year (I know, I know) this kicks butt on that.  I love the sweet heat of this sauce and can’t wait to try it with my bird tomorrow.  Confession?  I can’t wait to try in on my leftover turkey sandwiches after Thanksgiving.  Even bigger confession?  I will probably dump this on cream cheese or ricotta and eat it with crackers before it even takes it’s place on the table next to that stinkin’ bird.  So, from my table to yours, I hope you have a really great Turkey day and relish is all the things you are most thankful for.  Oh, and if you need something to be thankful for – make this.

Okay, so once I threw the jalapeno in, I just loved the festive color of the dish.  It made me want to start playing Christmas carols, almost.  So, I wanted to share this photo because well, I thought it was pretty.

CRANBERRY JALAPENO SAUCE

1 12 oz Bag of Fresh Cranberries, washed

1 Cup Water

1 Cup White Sugar

1-3 Jalapeno Peppers, cleaned, seeded and chopped (This pepper amount is dependent on how big of a spicy kick you want your sauce to have.  I used one larger one and one medium one and liked it just fine.)

Juice from 1/2 a Lime

1/4 Cup of Cream Sherry

Directions:

1.  Add sugar and water to a sauce over medium-high heat and bring to a slow boil.

2.  Add cranberries and lower heat, simmer for 10-12 minutes.

3.  Add Jalepenos and lime juice and continue to simmer another 10-15 minutes, until you get the consistency you want.

4.  Add in Cream Sherry and simmer a few minutes longer.

5.  Remove from heat and serve either room temp or chilled.

Cajun Spiced Pumpkin Seeds

Happy Halloween!  We did our pumpkin carving last night (kudos to Mr. Foodie for his Ninjago pumpkin) and like everyone should, we roasted the seeds.  Foodie Jr. isn’t a big fan of the pumpkin seeds, so Mr. Foodie and I agreed that it would be a yummy twist to do Cajun spiced seeds for us, since we like a little heat.  I didn’t so much use a recipe for this, as much as I eyeballed it, but I did put in some basic amounts.  I suggest you just play with yours –  to your liking.  Wishing all of you a happy and safe Halloween night – lots of treats and not so many tricks!

CAJUN SPICED PUMPKIN SEEDS

Ingredients:

-Seeds from one pumpkin, cleaned and dried (They say a regular sized pumpkin will yield about a cup to a cup and half of seeds, we got about a cup out of ours.)

~ 1-2 Tsp of your favorite Cajun Seasoning Blend

~ 1-2 Tsp Paprika (per your taste, mostly for color)

~1 Tsp Worcestershire Sauce

~1 -2 TBS Olive Oil

Directions:

1.  Preheat oven to 300 degrees.

2.  In a small bowl, combine all your ingredients and toss well, making sure the seeds are evenly coated with olive oil and seasonings.

3.  On a foil lined cookie sheet (you can also spray with cooking spray, but not needed) spread seeds in an even, single layer.

4.  Bake for about 45-55 minutes, turning seeds once about half way through cooking time.

Grilled Grilled Cheese

Fall is here and grilling season is coming to an end.  So, I thought I’d squeeze in just one more grill recipe before we head toward all things pumpkin and soup!  A friend hit the tomato jackpot in her garden and I got to inherit a whole lotta tomatoes!  We were grilling so I decided to do a little open face grilled cheese appetizer for us to chomp on while the meat cooked.  They are kind of funny looking but, they were tasty!

GRILLED GRILLED CHEESE

Ingredients:

16 Cherry Tomatoes, halved

4 Ciabatta Rolls, halved

8 Slices Havarti Cheese

1-2 Fresh Garlic Cloves

Olive Oil

Salt & Pepper

Directions:

1.  Fire up the grill and get those coals ready to cook!

2.  Scrape each piece of bread with the garlic clove and sprinkle with salt and pepper for flavoring.

3.  Brush top side of bread with olive oil and place top side down on the grill for a few minutes to brown and get some nice grill marks going.

4.  Flip bread pieces over and top with tomato halves (about 4 on each piece depending on the size of your tomatoes.)

5.  Top tomatoes with a slice of cheese.

6.  Heat until cheese is melted to your liking.

Elote

Elote is a Mexican street food – basically corn on the cob.  You may see it frequently being sold in some neighborhoods by people pushing little metal carts.  I really liked having my grilled corn like this, it gave it a nice creamy flavor with a little punch.  (Mr. Foodie said it was a little too creamy for his taste.)    It would be a little bit rich to have your corn this way all the time, but it was a nice addition to our little weekend BBQ feast.

ELOTE

Ingredients:

4 Ears of corn, still in husks but silk removed

1/4 Cup Melted Butter

1/4 Cup Mayonaise

Juice of 1/2 Lime

Crumbled Cotija Cheese

Hot Mexican Chile Powder

Lime Wedges

Directions:

1.  Grill corn in husks about 15-20 minutes, turning at least once during cooking time.

2.  While corn is grilling, mix melted butter, mayonaise and lime juice until well blended.

3.  Remove corn from grill, remove or pull back husks and spread butter mixture onto corn.

4.  Sprinkle with desired amount of chile powder and cotija cheese before serving with lime wedges.